Heatmap
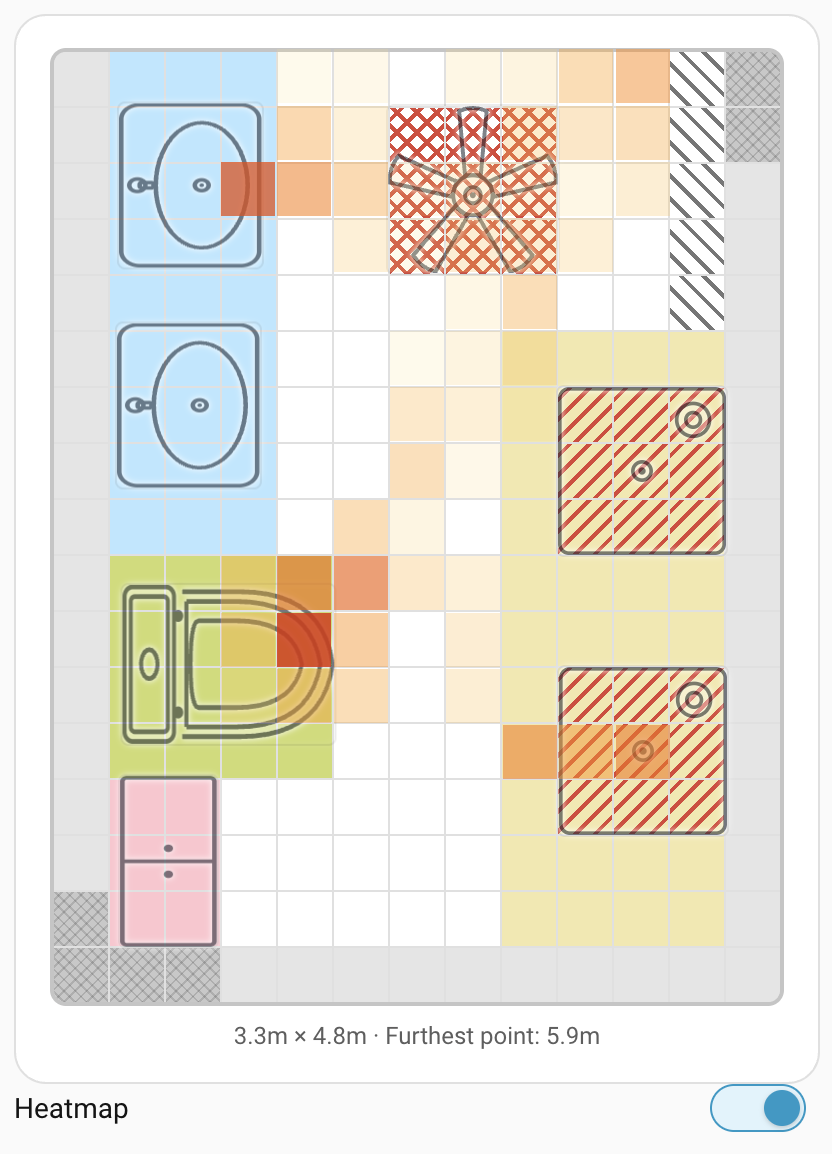
The Heatmap layer shows where people actually spend time and move through the room, drawn straight onto the live grid.
Turning it on
A Heatmap toggle sits alongside the live overview and the zone editor. Switch it on to overlay the grid with colour; switch it off to go back to the plain grid. The setting is remembered per device, so you don't have to re-enable it every time you open the panel.
What it shows
- Warmer cells = more time spent there. Cells build up colour — from a faint amber through to orange and red — the more a tracked target dwells or passes over them. Cells nobody visits stay uncoloured.
- It builds up gradually. A single visit barely registers; a spot people use every day (a favourite chair, a doorway, a desk) grows warmer over roughly the next two weeks.
- It fades on its own. Old activity fades out over about the same two-week span, so the heatmap reflects recent living patterns, not a permanent record of everywhere anyone has ever stood.
- Live movement trails. While the layer is on, you'll also see short lines trailing behind each tracked target, showing where it's been moving over the last few seconds. Trails are just a live visual aid — unlike the heat colouring, they aren't recorded or remembered.
Where the data lives
The heatmap is built and stored on the device itself, not in Home Assistant. It keeps building in the background whether or not the layer is switched on — turning the layer on just starts streaming the picture to your screen. It also survives a device reboot, so you won't lose weeks of build-up over a power cut.
No Home Assistant entity
The heatmap streams straight to the panel and card — it isn't a Home Assistant
sensor. Earlier versions exposed it as a sensor.*_heatmap diagnostic entity,
disabled by default; if you'd enabled it, it could show as unknown and log a
warning about its state being too long. Updating clears that up.
Update the device's firmware and the old entity disappears on its own — Home Assistant removes it automatically the next time the device reconnects. Want it gone sooner, before reflashing? Either disable the entity yourself, or just update the integration — that alone stops it being published, even on older firmware.
Requirements
The Heatmap layer needs firmware 1.8.0 or newer. If your device is on older firmware, the toggle is disabled with a note to update — see Firmware upgrades.
A small number of device variants don't have enough memory to run the heatmap feature at all. If that's the case, the toggle is disabled with a note that it's unavailable on that device — there's nothing to fix.
Clearing the heatmap
If you want to start the picture over — after rearranging furniture, moving the sensor, or just to wipe old activity — there are a few ways to clear it:
- From the panel. A Clear button (a small delete-sweep icon) sits next to the Heatmap switch on the live overview and the zone/overlay editor. Click it, confirm, and the heatmap is wiped for the device you're viewing. It's there whenever the heatmap is available — you don't need the layer switched on to clear it.
- From a dashboard card. If the card is set to Toggle and clear on card (see Overview dashboard card), a Clear button sits next to the heatmap switch on the map. It asks you to confirm before clearing.
- With the
eppgrid.clear_heatmapaction. Run it from Developer tools or an automation to clear one or more sensors, or every Everything Presence Grid sensor at once — see Automations.
Either way, clearing wipes the accumulated data permanently — there's no undo — and the cleared state survives a device reboot, so the heatmap starts building from empty rather than picking back up where it left off.
Where to next
- Live overview → — the rest of what the grid and side bar show you.
- Firmware upgrades → — update a device to unlock the Heatmap layer.